Tuckpointing & Brick Repointing Guide — Indianapolis & Chicago 2026
Tuckpointing & Brick Repointing: The Complete Guide for Indianapolis & Chicago Homeowners (2026)
Here's the thing nobody tells you when you buy a brick home: the brick isn't the problem. It'll outlast you, your kids, and probably their kids. The mortar between the bricks? That's a different story. Mortar joints typically last 25–30 years — which means if your home was built before 1995, the mortar may already be quietly failing.
Crumbling mortar lets water into your walls. Water freezes, expands, and destroys brick from the inside out. What starts as a $1,500 repointing job can balloon into a $15,000 wall rebuild if you ignore it long enough. In Indianapolis and Chicago — two cities with enormous inventories of older brick homes and brutal Midwest freeze-thaw winters — this is not a hypothetical. It happens every year.
This guide covers everything you need to know: what tuckpointing and repointing actually mean, how to spot a problem, what it costs, when to DIY, and how to hire a mason who won't make things worse.

Tuckpointing vs. Repointing: What's the Actual Difference?
These terms get used interchangeably — even by contractors — but they're technically different processes:
- Pointing is the original process of filling mortar joints when a brick wall is first built. Nothing fancy — just the baseline.
- Repointing (also called "tuck pointing" in common use) means removing deteriorated mortar from existing joints and replacing it with fresh mortar. The new mortar matches the joint profile and is visible — it looks like normal mortar repair.
- True tuckpointing is a cosmetic technique: you replace mortar with a color matched closely to the brick, then press a thin contrasting "fillet" of putty down the center to create the illusion of a very thin, crisp mortar line. It's used primarily on historic or high-visibility brickwork where appearance matters.
For most homeowners, what you need is repointing — remove the bad mortar, pack in the good stuff, done. When you call a contractor in Indianapolis or Chicago and ask for "tuckpointing," they'll understand what you mean. Just know that if you're dealing with a historic home, true tuckpointing (with color-matched mortar and decorative fillets) is a specialty service that costs more.
Why Midwest Homes Take a Beating: The Freeze-Thaw Problem
Brick homes in warmer climates have it easy. Their mortar ages slowly, and they might go 40+ years before needing repairs. In Indianapolis and Chicago? Not a chance.
Chicago averages 50–60+ freeze-thaw temperature swings per year (days where the thermometer crosses the 32°F mark). Indianapolis runs 40–55. Each swing works like this: moisture seeps into tiny cracks in the mortar, temperatures drop below freezing, that water expands by about 9% as it turns to ice, and the crack gets a little wider. Repeat that dozens of times every winter, add spring snow-melt, and by the time you notice a problem, the damage has been building for years.
Chicago has the added historical factor: after the Great Fire of 1871, city ordinances required brick construction throughout huge swaths of the city. That's why Chicago is one of the most brick-dense cities in America — and why nearly every block of older row houses, greystones, and two-flats has aging mortar that needs attention.
Indianapolis has its own inventory of pre-WWII brick bungalows (Irvington, Herron-Morton, Old Northside) and mid-century brick ranches spread across Marion County. Different architectural styles, same problem: mortar that's working past its expiration date.

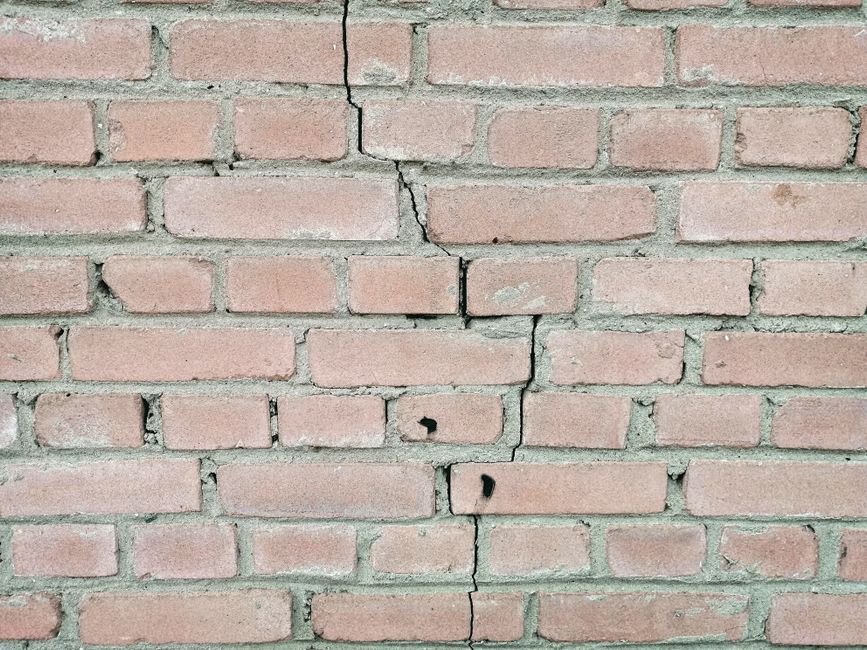
How to Tell If Your Mortar Needs Work
Do a walk-around of your home once a year — ideally in spring when you can see what the winter did. Here's what you're looking for:
- Cracking mortar joints — horizontal lines, vertical lines, or stair-step patterns running diagonally across the wall
- Recessed or crumbling mortar — joints sunken more than ¼ inch from the brick face, or mortar that falls out when you poke at it
- Efflorescence — white, chalky salt deposits on the brick face. That's mineral residue left behind when water moves through the wall and evaporates
- Dark staining around joints — water is getting in
- Interior dampness — damp spots on walls adjacent to exterior brick
- Spalling bricks — brick faces flaking off or chipping. Water got in, froze, and blew the face off the brick
- Loose bricks — the wall is structurally compromised; call a mason immediately
The quick test: grab a key or a flathead screwdriver and drag it across the mortar joint. If the mortar crumbles or falls out with light pressure, it's time to repoint. Healthy mortar is hard — you shouldn't be able to dig into it with your fingernail.
Pay special attention to mortar under windows (water pools there), around chimneys (exposed on all four sides), behind downspouts (concentrated water flow), and at ground level (splash-back from rain and snow). These spots fail first.

What Tuckpointing Costs in Indianapolis & Chicago (2026)
Here's the honest cost breakdown, not the lowball estimate you see on sketchy contractor sites:
| Job Type | Low End | Average | High End |
|---|---|---|---|
| Spot repair / partial wall | $500 | $1,500 | $2,500+ |
| Full house repoint (whole-home) | $5,000 | $8,000–$12,000 | $25,000+ |
| Per square foot (labor) | $5 | $10–$15 | $25 |
| Chimney repointing (cement mortar) | $500 | $1,000 | $2,000 |
| Chimney repointing (lime putty mortar) | $600 | $1,200 | $2,250 |
| DIY materials only | Under $1 per sq ft + ~$45/day tool rental |
Regional adjustments:
- Chicago: Expect to pay 15–25% above national average. Higher union labor rates, city permitting requirements on exterior masonry work, and scaffold costs for the city's taller housing stock all add up.
- Indianapolis: Generally 5–10% below national average. More competitive masonry market, lower labor overhead.
Work above 8 feet requires scaffolding — and contractors charge the top end of the per-square-foot range for elevated work. A two-story brick home where the second floor needs repointing will cost significantly more than a single-story ranch.
What drives costs up: lime-based historic mortar (more expensive than standard Portland cement mix), tight access (overgrown bushes, narrow side yards), the need to replace actual bricks (not just mortar), and color-matching requirements for visible or historic work.
DIY vs. Pro: How to Decide
Repointing is genuinely DIY-able — but only in specific situations. Here's the honest breakdown:
DIY Makes Sense When:
- It's a small spot repair — under 50 square feet, all ground level
- Color matching isn't critical (back of the house, not visible from the street)
- No scaffolding required
- The wall is structurally sound — no loose or missing bricks
- You have patience: expect about 20 square feet per day at a beginner pace
Call a Pro When:
- You're repointing more than one full side of the house
- Chimney work requires a ladder or scaffolding
- Any bricks are loose, missing, or need replacement
- Your home was built before 1940 (historic brick — see the warning below)
- You have persistent interior moisture problems (could indicate structural issues beyond mortar)
- The work is in a Chicago or Indianapolis historic district

DIY Step-by-Step: How to Repoint Mortar Joints
If you're doing a small, accessible repair, here's how to do it right:
Tools You'll Need
- Angle grinder with 4½-inch diamond blade (rentable for ~$45/day)
- Cold chisel and hammer
- Rubber gloves, safety glasses, dust mask
- Brick trowel and 3/8-inch pointing trowel
- Jointing tool matching your existing joint profile (concave, V-joint, or flush)
- Whisk broom or compressed air
- Garden hose
Step-by-Step Process
- Remove the old mortar. Use the angle grinder to cut a relief groove ¾ to 1 inch deep down the center of failing joints. Work vertical joints before horizontal to avoid nicking bricks. Use the hammer and chisel to chip out remaining mortar.
- Clean the joints. Dust out debris with a whisk broom or compressed air. Lightly mist the joints with water — this keeps the brick from sucking moisture out of the new mortar too fast.
- Mix your mortar. Follow the manufacturer's water ratio exactly. Target the consistency of peanut butter — sticky enough to cling to an inverted trowel. Let it rest 10 minutes and remix. Never add water to revive drying mortar. Mix a fresh batch.
- Fill horizontal joints first. Load mortar on the back of the brick trowel, hold it under the joint, and sweep thin slivers into the cavity with the pointing trowel. Pack tight — no voids.
- Fill vertical joints. Use smaller mortar loads and pack in from top to bottom.
- Finish the joint profile. When mortar reaches "thumbprint hardness" (takes a faint imprint but holds its shape), run the jointing tool along the joints to match the profile of the surrounding existing mortar.
- Cure it. Keep fresh mortar damp for the first 24–48 hours in hot, dry conditions. Avoid rain or freezing temps for at least 24 hours.
Midwest weather warning: Don't repoint below 40°F. The mortar won't cure properly and may freeze before it sets. Best DIY window in Indianapolis and Chicago is late April through October. Avoid working on south-facing walls in direct summer sun if temps exceed 90°F — the mortar will dry too fast and crack.

How to Hire a Mason in Indianapolis or Chicago
Masonry is one of those trades where the difference between a good hire and a bad one can cost you thousands. Here's how to vet someone properly:
What to Ask Before You Hire
- "What mortar type and mix ratio will you use?" (They should know the answer and be able to explain why.)
- "Have you worked on homes built before 1940?" (If yes, do they know about soft brick and lime mortar?)
- "Can you show me examples of color-matched repointing work?" (Photos or references from similar jobs)
- "Do you pull permits for this work?" (Chicago especially requires permits for exterior masonry on multi-unit buildings)
- "Are you familiar with the Chicago Landmark Commission / Indianapolis Historic Preservation Commission requirements?" (Applies if your home is in a historic district)
Red Flags
- Won't discuss mortar type — just quotes a price
- Offers to "seal over" cracked mortar rather than remove and replace it
- Quotes a suspiciously low price without inspecting the wall up close
- Wants cash upfront for the full job
- Proposes Portland cement on clearly old, soft brick without any conversation about it
Get three quotes. Ask each contractor to write the mortar type and mix ratio into the written estimate. Spring and fall are busy seasons — book early to avoid getting squeezed into a contractor's rushed schedule at the end of a full workday.
Frequently Asked Questions

- How long does tuckpointing last?
- Done correctly with the right mortar, repointing lasts 25–30 years. Done with the wrong mortar on historic brick, it can fail — and cause additional damage — within a few years.
- Can I just seal over cracked mortar instead of repointing?
- No. Masonry sealers can slow water infiltration, but they don't fix failed mortar. The joint will continue to fail underneath, and you'll have a harder time repointing later because the sealer interferes with adhesion. Remove and replace deteriorated mortar — don't mask it.
- Does tuckpointing require a permit in Chicago or Indianapolis?
- In Indianapolis, small residential mortar repairs typically don't require a permit. In Chicago, tuckpointing on any building — single-family homes included — generally requires an Easy Permit through the Chicago Department of Buildings, and work must be performed by a licensed masonry contractor. Don't skip it; unpermitted work can create issues when you sell. Historic district work has additional requirements in both cities.
- What's the best time of year to repoint in the Midwest?
- Late April through October is ideal. Avoid temperatures below 40°F (mortar won't cure) and periods of heavy rain. If you're hiring a contractor, book spring or early fall before the backlog builds up.
- How can I tell if my mortar issue is structural?
- Call a professional immediately if you see: stair-step cracks running through both mortar AND bricks (not just the joints), bulging or bowing walls, multiple loose bricks in the same section, or a chimney that's leaning or separating from the house. These are signs of foundation movement or serious structural failure — not just mortar wear.
- Is tuckpointing worth it on a house I'm planning to sell?
- Yes. Failed mortar is a red flag for home inspectors and buyers, and it depresses appraised value. Fresh, clean repointing improves curb appeal and removes a negotiating chip from any buyer who'd use it to knock down your price. The ROI on maintenance-level masonry work is strong.
Conclusion: Don't Wait Until It's a Big Problem

Brick is one of the most durable building materials on the planet. A well-maintained brick home can stand for 150+ years. But "well-maintained" is the key phrase — and in Indianapolis and Chicago, maintaining brick means staying ahead of mortar deterioration before freeze-thaw cycles turn hairline cracks into structural damage.
Walk around your house this spring. Grab a key. Drag it across the mortar joints. If it crumbles, you know what to do. Small spot repairs are a weekend project. A full wall repoint is a few days of professional work. Either way, it's a fraction of the cost of what happens when you let it go.
Find Trusted Pros Near You
Ready to start your project? Connect with vetted, top-rated contractors in your area.
Get Started